Hello everyone~
I want to do an overal review for BBcreamshop, a website that offers Korean cosmetics and skincare to European countries. I was so happy when I found out about them, because ordering Korean cosmetics has always been a bit of a problem for me, but not anymore! I've mentioned this website a couple times before on my facebook page, but I want to dedicate a blogpost to them now, because they definitely deserve the publicity. I'll explain why!
First of all, their service is amazing. I placed an order at around 7pm and I got it the next day. Packed in a small box filled with soft protection material came my bb cream samples and whitening serum, along with many other samples and an etude house yogurt mask which they generously sent me as well.
The products they offer are from various brands, providing us with a long but organized list to choose from. Want to experiment with different bb creams to find out which one suits you best? No problem! Just order a couple of the 3 - 4 euro samples and give them a try! The bottles will last you about one to two weeks each, depending on how much you put on, so it's a great deal. If you like one of them but you're not willing to buy the big bottle? No problem! Most of the popular BBcreams they offer also have a traveling size, which is perfect if you want something bigger than the sample, but cheaper than the full sized bottle.
Not only do they offer BBcreams, but also many skincare and makeup products. I will start doing reviews of their products soon, so stay tuned for those.
As for the prices, I was very pleased with those, too. Of course, you could go for Ebay and pay even less, but I personally don't like the risks that come with Ebay and also the shipping tends to take forever. BBcream shop is fast, cheap and friendly. I really recommend them to all of you in Europe who are looking for a good and trustworthy place to order Korean cosmetics.
Love,
May

01-10-2013
I'm back~
Hello everybody~
After quite the break I'm officially back! I'll be blogging on a weekly base again with more reviews, DIYs, tips and tricks and all the good stuff :)
I apologize for being inactive for such a long time, but I will make up for it, I swear. So please bare with me~
Love,
May
After quite the break I'm officially back! I'll be blogging on a weekly base again with more reviews, DIYs, tips and tricks and all the good stuff :)
I apologize for being inactive for such a long time, but I will make up for it, I swear. So please bare with me~
Love,
May
17-06-2013
Skintype interview: Oily Skin (With Mahalia-Paris aka ShySmileLove! )

Age: 16
Race: Multiracial : Jamaican and Indian
Country: England
Blog/Youtube link: http://www.youtube.com/user/ShySmileLove
Race: Multiracial : Jamaican and Indian
Country: England
Blog/Youtube link: http://www.youtube.com/user/ShySmileLove
1. How old were you when you started to use makeup frequently? What did you put on?
I started wearing make up when i was 12 and i wore lipgloss and mascara my 2 all time favourites
2. What does your daily makeup consist of nowadays?
My daily make up consists of Eyeshadow, Eyeliner, Mascara, foundation, and blush.
3. What do you do to take care of your skin?
I wash my face every morning with Body Shops Tea Tree Gel Wash and then put calamine lotion on after to soothe my skin and at night i wash my face with St Ives Apricot scrub and then tone with some West Indian Bay Rum, and 2 days out the week i do a lemon, sugar, honey and avocado facial mask.
I wash my face every morning with Body Shops Tea Tree Gel Wash and then put calamine lotion on after to soothe my skin and at night i wash my face with St Ives Apricot scrub and then tone with some West Indian Bay Rum, and 2 days out the week i do a lemon, sugar, honey and avocado facial mask.
4. Do you use special products for your skin type?
Yes because my skin is oily i use an oil free moisturiser such as body shops Seaweed Mattifying Day Cream.
Yes because my skin is oily i use an oil free moisturiser such as body shops Seaweed Mattifying Day Cream.
5. Are there any troubles that your skin type gives you, and other skin types might not experience?
I have a combination of oily and dry skin: oily in t zone and dry on my cheeks so i have to use certain products on certain areas which is kind of annoying also i usually get spots on my cheek area which leaves horrific scars TT_TT !
I have a combination of oily and dry skin: oily in t zone and dry on my cheeks so i have to use certain products on certain areas which is kind of annoying also i usually get spots on my cheek area which leaves horrific scars TT_TT !
6. If yes, do you do anything about those problems?
To combat the problems i always make sure i tone my face and use a facial wash for all skin types and exfoliate my skin gently every night !
To combat the problems i always make sure i tone my face and use a facial wash for all skin types and exfoliate my skin gently every night !
7. Do you have tips for other people who have your skin type?
hmm a tip. Make sure you take all of your make up off before going bed and if your cheeks are dry like mines the avocado in the facial scrub helps with dryness !
hmm a tip. Make sure you take all of your make up off before going bed and if your cheeks are dry like mines the avocado in the facial scrub helps with dryness !
8. Is there something you would change about your skin?
The thing i would change about my skin is having 2 types of skin types on my face, I would rather have normal skin !
9. Are there certain makeup products you can not use because of your skin type? Which ones?
Yes, i can not use foundation that has oils in it because i have gigantic pores and it will cause my to have spots
Yes, i can not use foundation that has oils in it because i have gigantic pores and it will cause my to have spots
10. Is there something about your skin that troubles you, but you haven't found a solution yet?
Yes i have Acanthosis Nicgricans which is a pigmentation skin disorder, so i have random dark pigmentation areas my face and body and i refuse to bleach them away so i dunno what to do.
14-06-2013
Bubble Tea DIY!
Hey there lovelies! Today's blog is all about bubble tea!
Recently I've been drinking this wonderful drink an awful lot, and I decided I wanted to try and make my own! Check out this video to see how to make bubble tea :)
Recently I've been drinking this wonderful drink an awful lot, and I decided I wanted to try and make my own! Check out this video to see how to make bubble tea :)
04-06-2013
Skintype interview: Combined skin. [With Anna Rius aka Sakura7Akai]

First name: Ana
Age: 21
Country: Spain
Check out her youtube page right here!
1. How old were you when you started to use makeup frequently? What did you put on?
Uhm... I'm not sure, but maybe at 17. I don't remember what I used to put on.
2. What does your daily makeup consist of nowadays?
Concealer, BB Cream, Mineral powder, blush, lipbalm, eyeliner, liptint and gloss.
3. What do you do to take care of your skin?
Everyday, at morning, I clean my face with a brush cleaner and special moisturizer for acne. Also once a week I use a natural exfoliation with a tea bag.
4. Do you use special products for your skin type?
No.
5. Are there any troubles that your skin type gives you, and other skin types might not experience?
Not really....
6. If yes, do you do anything about those problems?
-
7. Do you have tips for other people who have your skin type?
A clean and healthy skin, the prettiest skin
8. Is there something you would change about your skin?
The color, maybe, I have a very white skin.
9. Are there certain makeup products you can not use because of your skin type?
No.
10. Is there something about your skin that troubles you, but you haven't found a solution yet? Uhmm... no.
28-05-2013
Outfit of the day: 28-05-13

White sleeveless blouse: H&M, €10,-
Black Cardigan: Primark, €10,-
Black Tanktop: H&M, €5,-
Light blue studded shorts: Primark, €14,-
Pink necklace: Primark, €3,-
Studs and Pearls headband: Claire's €8,-
Pink wedge sandals: Primark, €18,-
27-05-2013
Pearl cat-ear headband DIY

Okay, so maybe I'm a bit late with this trend, but still I think it's cute enough to make a post for it even though it's been around for a while now. Maybe you've seen this before... Maybe not. The animal-eared headbands, and the cat ones in particular!

I think it looks really cute and I'm really happy to see both kpop idols as well as western pop singers sharing a trend! I got a pair of adorable pearl-bear ears, but I really wanted a pair of cat ears as well. But because I couldn't find it where I live, and I'm not patient enough to wait for it to arrive when I buy it online, I decided to make some myself! And it's actually really really easy!
Here's what you'll be needing to make your own pair of cute cat ears!

A plain headband
Some pearl-beads
Wire that's strong enough to hold the beads and thin enough to fit through them
Strong glue
Pliers (One to cut, one to bend and one to pinch!)

Step one. You're going to cut off some wire. Don't take too little, you can always take some off again if you're not satisfied. Then, take another section that's about the same length as the first one.
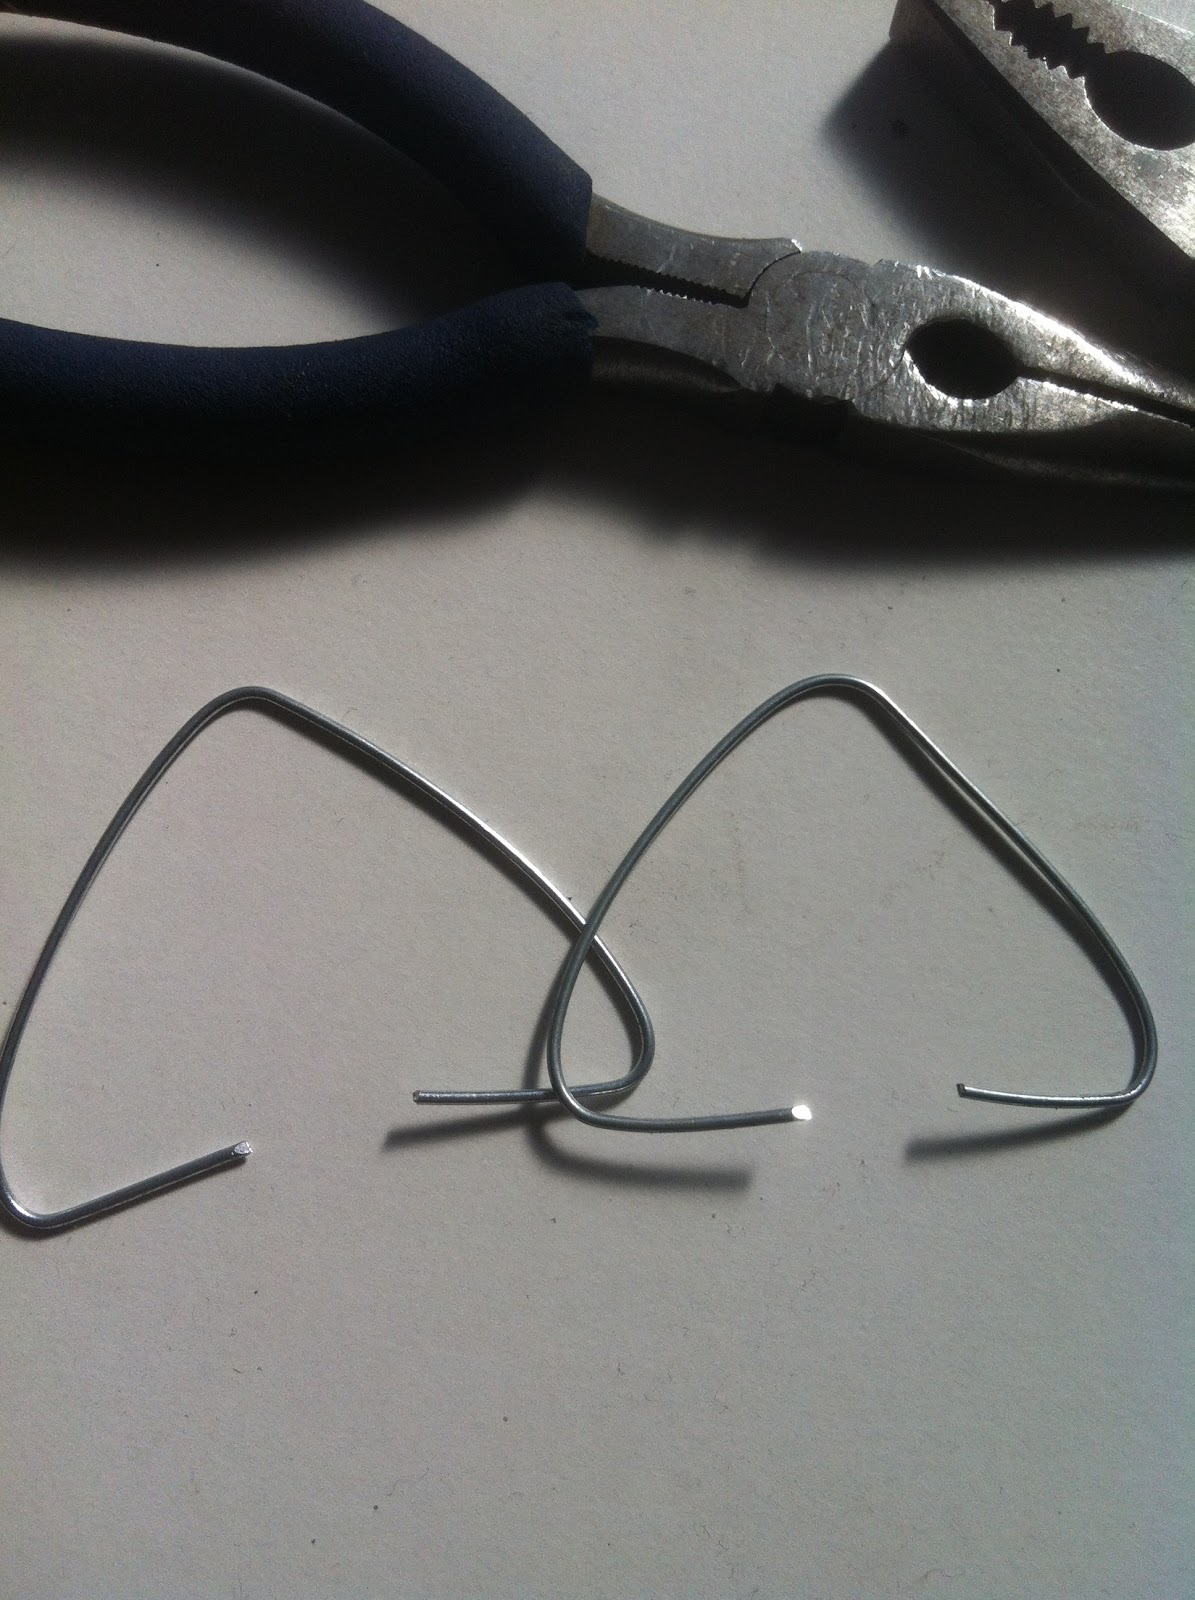

Step two. Using a round edged plier, bend the middle of your pieces of wire to create a corner. You can make this as sharp as you want to depending on what you think looks the best. Then, bend the left and the right side of the corner you made to create the triangle shapes of the cat-ears.

Step three. Use the pearl beads, or any decoration you want to use to cover up the wire. Some cat ear headbands only have a couple of pearls, but I decided to cover the entire ear's outline in pearls and since I used beads, it was very easy. However, if you don't want to use as many pearls, you can just use some glue to stick the decorations to the ears.

Step four. Secure the ears onto the headband. I tried using some wire to tie them on there first, but that didn't work out for me because I'm not strong enough to pinch the wire tightly enough to keep them in place. Instead I used some ribbon, glued it to the headband and then tied it around the wire to keep the ears in place. If you're using this method, make sure to wrap it tightly, otherwise your ears are going to flap forward when you wear them.

And there you go! Your very own home-made cat ear headband! Please feel free to leave a comment or a request right here, or on my Facebook page! Also I'd love to see your creations, so don't be shy and send me a picture if you decide to make one of your own~ Thanks for stopping by at my blog! Like my Facebook page for updates and subscribe to my Youtube channel for video-tutorials and more!
Have fun making your headband and take care!
<3,
May.
Abonneren op:
Posts (Atom)